Comments with Giscus
Comment sections are a great addition to any blog post for community building and for getting instant feedback about your content. In this guide we’ll walk through setting up Giscus and dropping the widget into a blog in just a few easy steps.
Giscus Introduction
Giscus is an open-source commenting system for websites and blogs that leverages GitHub Discussions to store and manage comments. It provides a way to integrate a comment section into your website without requiring a separate database or backend infrastructure.
| Giscus Pros | Giscus Cons |
|---|---|
| Open-source and free | Requires GitHub account to comment |
| No database needed | |
| Easily embedded in any website | |
| Supports markdown & reactions |
Repository for Giscus
Comments added vis Giscus are stored as discussions within a designated GitHub repository, allowing for easy management and moderation through GitHub’s interface. Our first step will be to open a new public repository. 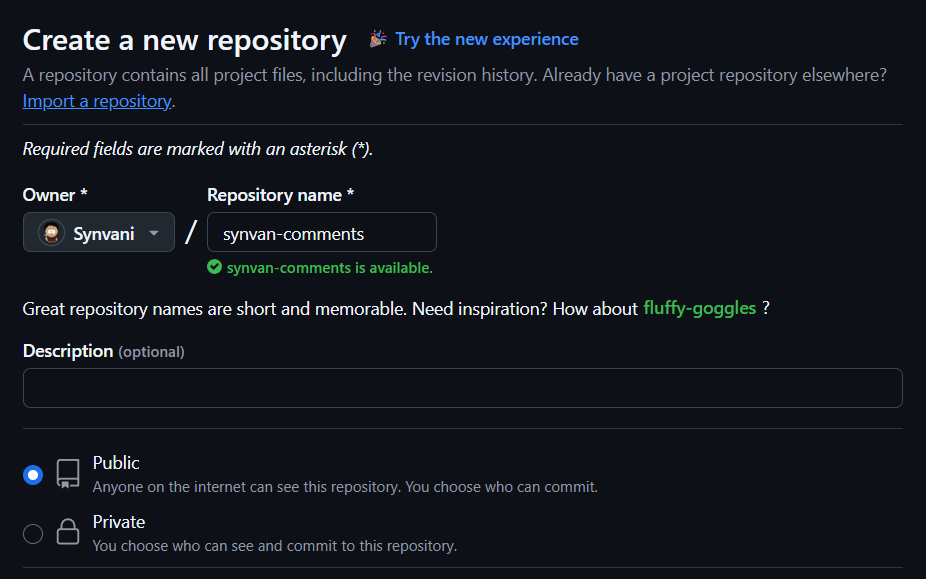
Next, we will activate the GitHub Discussions feature for our new repository.
- Navigate to Settings inside the new repository.
- Confirm you’re inside the General sub-menu.
- Find the
Featuressection and check the box next toDiscussions.

Giscus Installation
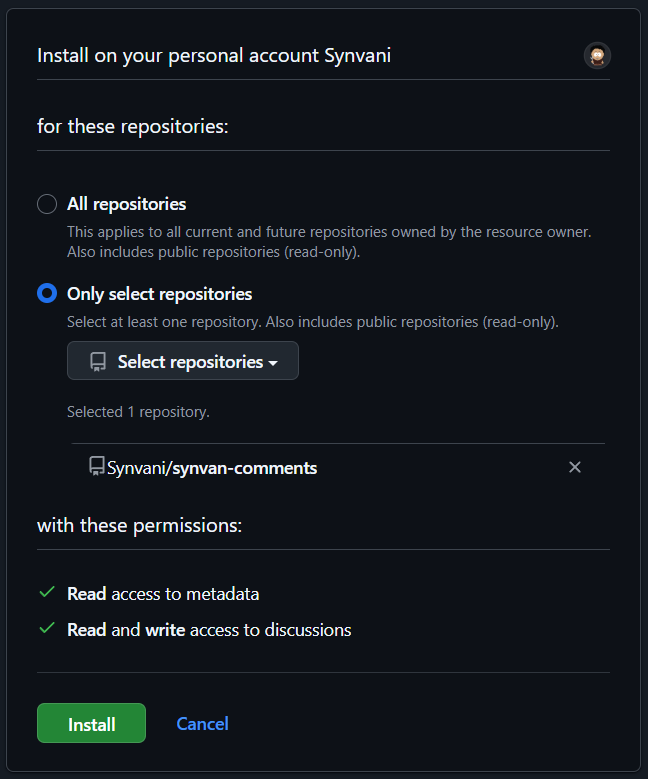
Giscus application is available on the GitHub Marketplace.
- Find Giscus within GitHub Marketplace, or use this direct link.
- Click on the large Install button.
- Choose installation for
Only select repositories, select your newly created repo and approve the installation.
Giscus Config
Now that Giscus is successfully installed and part of our new repository, it is time to the add some code to the website. To generate the Giscus configuration code we need to add, hop over to Giscus webpage and scroll down to the Configuration section.
First, plug-in the name of your repository to make sure that you meet all pre-requisites: 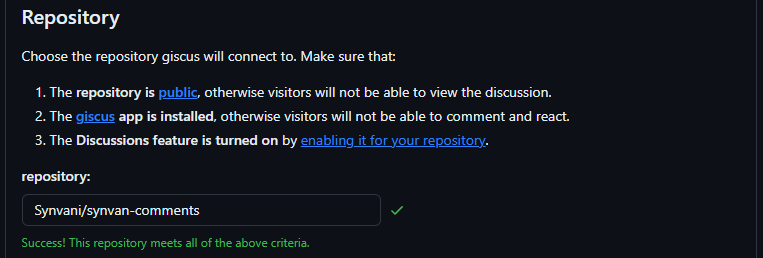
Now follow the next sub-sections in the Giscus configuration, here are the key settings that need to be adjusted:
- Page to Discussions Mapping – recommended to leave as default (
pathname), you can always change this later if you need more specific mapping in your case. - Discussion Category – choose
Announcements. - Lazy loading (Optional) – I like to turn this one ON to avoid large comment sections from slowing down the main webpage content loading.
Once done at the bottom of the Configuration section you’ll see an excerpt of the config script, mine looks like this:
1
2
3
4
5
6
7
8
9
10
11
12
13
14
15
16
<script src="https://giscus.app/client.js"
        data-repo="Synvani/synvan-comments"
        data-repo-id="R_kgDOPTLiRg"
        data-category="Announcements"
        data-category-id="DIC_kwDOPTLiRs4Ctb-4"
        data-mapping="pathname"
        data-strict="0"
        data-reactions-enabled="1"
        data-emit-metadata="0"
        data-input-position="bottom"
        data-theme="dark_tritanopia"
        data-lang="en"
        data-loading="lazy"
        crossorigin="anonymous"
        async>
</script>
Giscus on Generic Blogs
If you’re using the Chirpy theme you can skip reading this section, as Chirpy’s author already took care of integrating Giscus configuration into the theme.
For a generic blog, you’d want to follow-up on Jekyll’s Includes documentation. In a nutshell, the recommended approach is to create a new HTML file within your _includes folder to store your entire Giscus configuration, and then call that file from the a footer.html file.
- Start by creating the new HTML file, for example
comments.html, inside your_includesfolder. - Copy the contents of Giscus configuration into that file and save it.
- Add
{% include comment.html %}to yourfooter.htmlfile. Based on your Jekyll theme, you may want to add some conditios whether to show the Giscus comments or not based on the webpage type (e.g., show on posts, but hide on landing page). - If you do not have a
footer.htmlyou can simply add{% include comment.html %}to the bottom of every blog post. However, you should really consider refactoring your theme and adding afooter.htmlto manage your website structure more efficiently.
Giscus on Chirpy
If you’re using Chirpy, the author of the theme already did the work of integrating Giscus into the website, so there’s not much more work left to be done. Open the _config.yml file, find the comments section and plug in the information from Giscus configuration directly into their relevant fields.
1
2
3
4
5
6
7
8
9
10
11
12
13
14
15
16
comments:
  provider: giscus # [disqus | utterances | giscus]
  disqus:
    ...
  utterances:
    ...
  giscus:
    repo: Synvani/synvan-comments # <gh-username>/<repo>
    repo_id: R_kgDOPTLiRg
    category: Announcements
    category_id: DIC_kwDOPTLiRs4Ctb-4
    mapping: # optional, default to 'pathname'
    strict: # optional, default to '0'
    input_position: # optional, default to 'bottom'
    lang: # optional, default to the value of `site.lang`
    reactions_enabled: # optional, default to the value of `1`
Giscus Theme Customization
You probably noticed there’s no field for theme selection in Chirpy’s _config.yml file. If you’re using Chirpy Starter then there is nothing left for you to do – Chirpy’s author already took care of business and Giscus theme should change based on your Dark\Light theme selection. However, if you’ve forked the theme and made some visual customizations, you may want to modify also the Giscus theme itself.
Let’s navigate to _includes/comments and open giscus.html:
1
2
3
4
5
6
7
8
9
10
11
12
13
14
15
16
17
18
19
20
21
22
<script>
  (function () {
    const themeMapper = Theme.getThemeMapper('light', 'dark_dimmed');
    const initTheme = themeMapper[Theme.visualState];
    ...
    let giscusAttributes = {
      src: 'https://giscus.app/client.js',
      'data-repo': '{{ site.comments.giscus.repo}}',
      'data-repo-id': '{{ site.comments.giscus.repo_id }}',
      'data-category': '{{ site.comments.giscus.category }}',
      'data-category-id': '{{ site.comments.giscus.category_id }}',
      'data-mapping': '{{ site.comments.giscus.mapping | default: 'pathname' }}',
      'data-strict' : '{{ site.comments.giscus.strict | default: '0' }}',
      'data-reactions-enabled': '{{ site.comments.giscus.reactions_enabled | default: '1' }}',
      'data-emit-metadata': '0',
      'data-theme': initTheme,
      'data-input-position': '{{ site.comments.giscus.input_position | default: 'bottom' }}',
      'data-lang': lang,
      'data-loading': 'lazy',
      crossorigin: 'anonymous',
      async: ''
    };
You’ll notice on line 16 that data-theme is calling initTheme (which is defined on lines 3-4). There are two options here:
- Modify the
themeMapper(line 3), so that it maps to a different Giscus theme when your website is viewed in Light or Dark mode. - Modify the
data-themeto read value from_config.ymldirectly, similar to other parameters (recommended if you’re not allowing theme switching).
Since I modified my website to work only in Dark mode I’ll continue with option #2 – let’s start by making some minor modifications so that this HTML file will be reading the data-theme parameter from _config.yml as well:
1
2
3
4
5
<script>
    ...
    let giscusAttributes = {
      ...
      'data-theme': '{{ site.comments.giscus.theme | default: 'dark_dimmed' }}',
Now let’s go back to _config.yml and add our new variable:
1
2
3
comments:
  giscus:
    theme: # optional, default to the value of `dark_dimmed`
That’s it! Now you can choose your favorite theme from the Giscus website and plug it in directly inside _config.yml. When you reload your website (changes to Jekyll’s _config.yml always require reloading the website) you should see Giscus theme changing based on your input!
Wrap-up
If everything was configured correctly you should now be able to see the Giscus comments inside your website. You should test it by posting a dummy comment and making sure everything registers with GitHub Discussions feature as expected. If you have any questions or suggestions, please use the Giscus comments section of this post!