Deploying Python Dash Apps
A step-by-step guide to deploying a Python Dash app online using PythonAnywhere – from setup to live demo in minutes.
I recently put together a small web app in Python using Dash – it was great fun to build and actually relates to a video game I was playing during peak Covid-19. The app is not too fancy, it lets you adjust many inputs and makes some calculations easier and faster, including plots for better visualization of the results.
The app worked great on my machine, but at some point I thought it was time to share it with others who might find it useful too. That’s when I started looking into how to actually deploy a Dash app so it could live on the web and be accessed by anyone with a browser.
Dash App Deployment Options
I started looking into options for hosting my Dash app online with minimal cost – it’s a side-project after all with no intention to generate any profit. There are several platforms worth considering, each offers free tier or low-cost tier that get the job done. Each platform has different trade-offs in performance, resource limits, setup, and restrictions.
I did some quick research and tried to put some conclusions in a table:
| Platform | Setup Ease | Free Tier Limits | Best For |
|---|---|---|---|
| Plotly Cloud | Very easy (upload only) | File size & dependency limits, fewer customization options | Quick sharing of small Dash dashboards |
| Render.com | Very easy (GitHub + config) | Limited instance hours & bandwidth; cold starts if idle | General-purpose hosting, Heroku-style |
| PythonAnywhere | Easy (UI-based upload) | 1 web app, 512 MB disk, CPU throttling, no custom domain | Beginners, lightweight apps, simplicity |
| Railway.app | Easy (GitHub linked) | Small monthly credit (~$1), low RAM/CPU, ephemeral file system | Hobby projects, CI/CD experimentation |
The choice really comes down to your requirements and what you value most. If you just want to share a simple dashboard quickly, Plotly Cloud is the fastest way. If you prefer GitHub-connected deployments and don’t mind some resource limits, Render and Railway are both solid picks. Google Cloud is overkill unless you’re aiming for a production-grade setup (I didn’t bother adding it to the table). For my needs though PythonAnywhere was the best fit – a lightweight app, minimal setup time, and a beginner-friendly workflow.
Step by Step with PythonAnywhere
Let’s get down to business – I’ll walk through all steps I did deploying my web app. A lot of the information below can be found in PythonAnywhere’s documentation or support forums, but here it is all compiled and will likely work for most lightweight app configurations.
Expose the Flask server
Before we get into PythonAnywhere’s system, let’s prepare the Python project first:
- Open
app.py(or whatever your Dash entry filename is). - Ensure you set
server = app.server(PythonAnywhere needs that server object), as below:
1
2
3
4
5
6
7
8
9
from dash import Dash, html

app = Dash(__name__)
app.layout = html.Div("Hello from Dash on PythonAnywhere!")

server = app.server   # expose the Flask server for WSGI

if __name__ == "__main__":
    app.run_server(debug=True)
Prepare Your Project
Make sure your project follows this structure:
1
2
3
4
mydashapp/
├─ app.py
├─ requirements.txt
└─ assets/
Example for the contents of a requirements.txt file:
1
2
3
4
5
6
dash
dash-bootstrap-components
plotly
numpy
pandas
dash[diskcache]
Other deployment platforms may require you to add specific packages. For example, Render.com will instruct you to add ‘gunicorn’ to this
requirements.txtfile.
Start a Bash Console
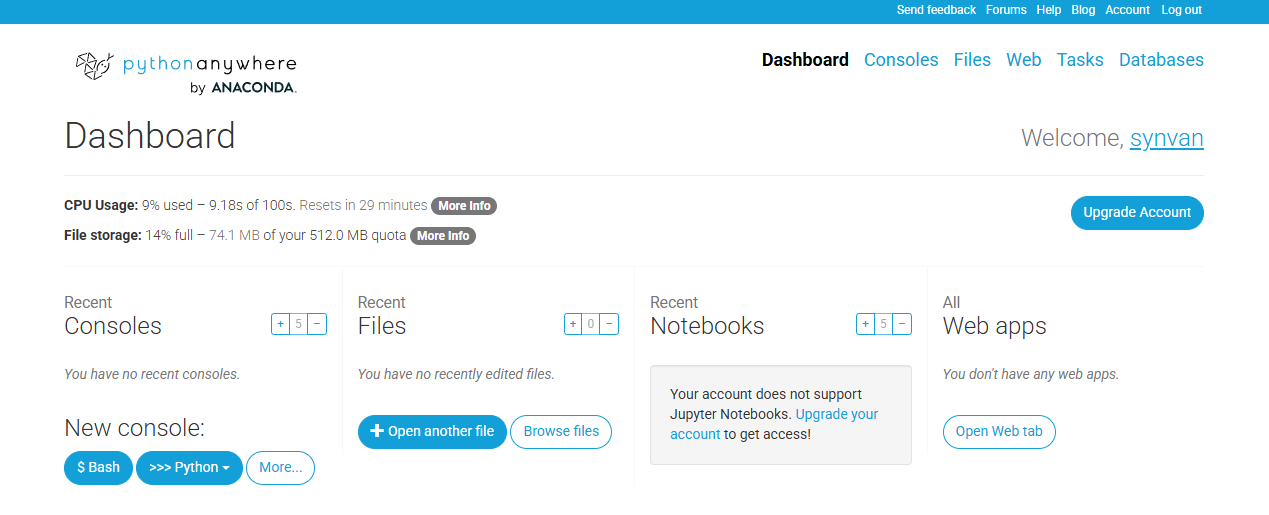
- Sign in to PythonAnywhere (or create a new account).
- In Dashboard tab, under New Console section, find the start button to fire up a bash console. Alternatively, navigate to Consoles tab → start a Bash console (bottom-left of the screen).
Create a Virtual Environment
Create a virtualenv (either
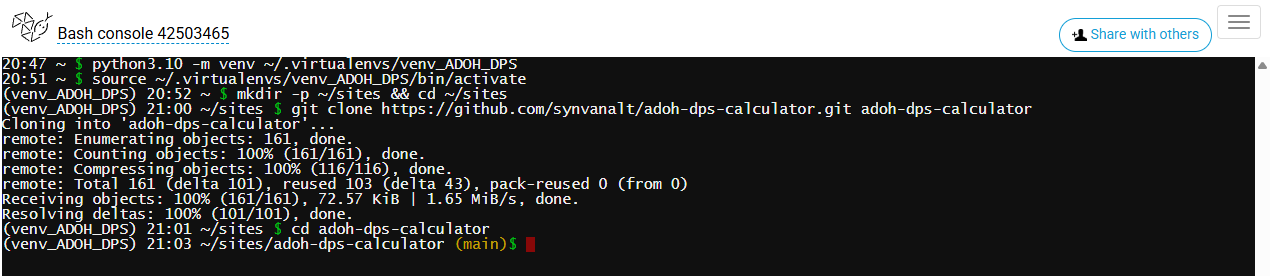
venvorvirtualenvwrapper, both are fine) – pick the same Python version you’ll choose for the web app itself later.1 2
python3.10 -m venv ~/.virtualenvs/mydashapp source ~/.virtualenvs/mydashapp/bin/activate
 Bash console at PythonAnywhere
Clone your project from the GitHub repository (or upload files manually via the Files tab).
1
2
3
 mkdir -p ~/sites && cd ~/sites
 git clone https://github.com/<username>/<repo>.git mydashapp
 cd mydashapp
 Bash console at PythonAnywhere
Install all required packages (
requirements.txt) – this may take a bit of time depending on the size of the required packages.1
pip install -r requirements.txt
Add a New Web App
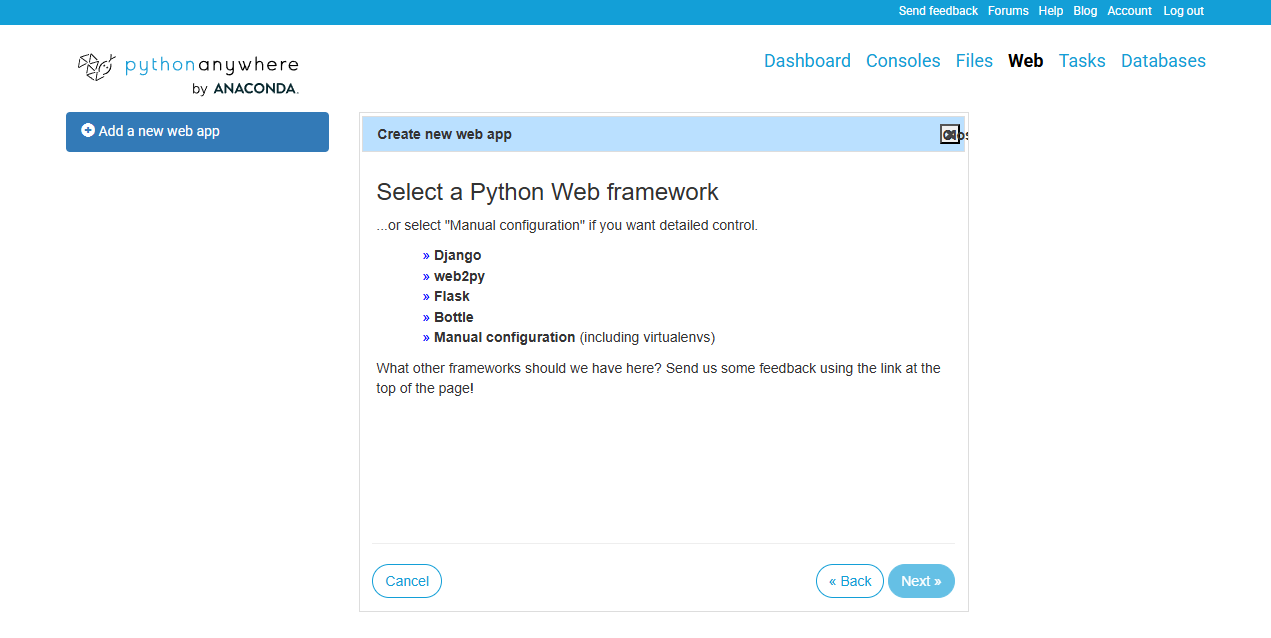
- Go to the Web tab.
- Click Add a new web app and follow the wizard dialog.
- When prompted to choose a Python Web Framework → choose Manual configuration.
- When prompted to select a Python version → select the same version as installed in the virtual environment earlier.
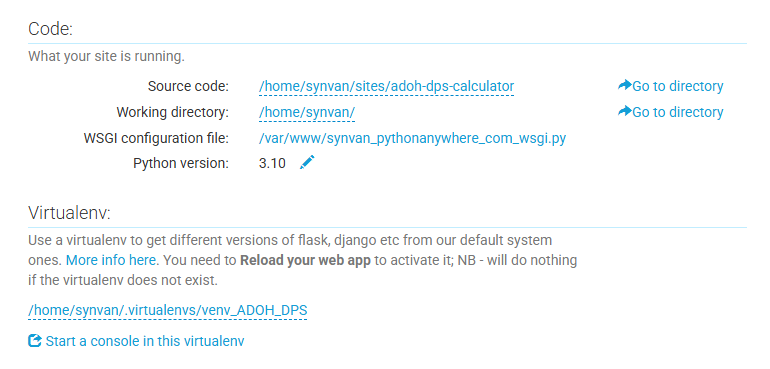
Once the web app is created, scroll down a little until the Code and Virtualenv sections and apply the following:
- Source code – set to
/home/<username>/sites/mydashapp. - Virtualenv – set to
/home/<username>/.virtualenvs/mydashapp
Edit the WSGI Config
This is needed for the WSGI config to properly point to your Dash app:
- On the Web tab, click the WSGI configuration file link.
- A file editor will open, scroll down to find the
# +++++++++++ FLASK +++++++++++section. - We’ll now uncomment the relevant lines and modify them to fit our app:
1
2
3
4
5
6
7
8
9
10
import sys

# Add your project folder to the path
project_home = '/home/<username>/sites/mydashapp'
if project_home not in sys.path:
    sys.path.insert(0, project_home)

# Import the Dash app and expose its Flask server as "application"
from app import app
application = app.server
In the end, the section should look like this:
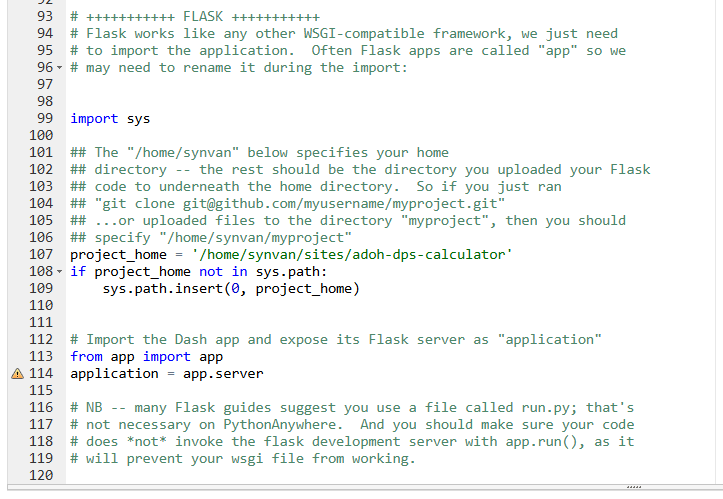
That application = app.server line is the key for Dash on PythonAnywhere.
Click Save to keep your changes.
Reload Web App and Test
Go back to the Web tab and click to Reload the web app.
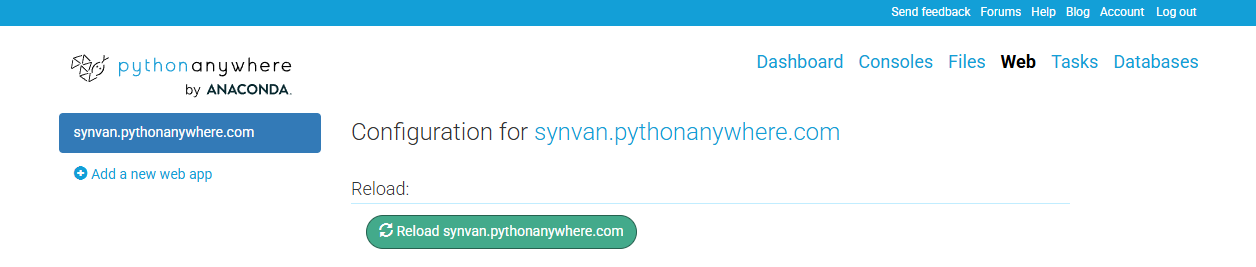
Once the reload operation is done, open your browser and navigate to your app’s webiste, the path should be https://<username>.pythonanywhere.com.
The free plan doesn’t allow changing the domain name, but if that’s required you can always do some basic testing for a week first, see if you’re happy with the general performance and usability of the platform, then upgrade to a better plan later on.
Environment Variables
If you need to set up environment variables, the recommended method is to create .env file and load it in the WSGI file using python-dotenv:
- Create a
.envfile: In the root directory of your project, create a file named.envand add your key-value pairs (e.g.,DATABASE_URL=your_database_url). - Install
python-dotenvvia bash console:pip install python-dotenv
1
2
3
4
5
6
7
import os
from dotenv import load_dotenv

project_home = os.path.expanduser('~/sites/mydashapp')
load_dotenv(os.path.join(project_home, '.env'))

DATABASE_URL = os.getenv('DATABASE_URL')
Alternatively, you can set set vars directly in the start of your WSGI file, before importing your app:
1
2
3
import os

os.environ['DATABASE_URL'] = 'your_database_url'
Then, translate the environment variable into a form that can be used in your app:
1
DATABASE_URL = os.getenv('DATABASE_URL')
Don’t forget to Save the file and Reload web app after changes.
Consider security – never commit sensitive
.envfiles (holding secret keys) to version control (e.g., Git). Add.envto your.gitignorefile to avoid that. The same applies to WSGI file in case you decided to store vars directly in it.
Steps Summary
server = app.serverin your Python Dash code.- Create venv → install reqs → code in
~/sites/mydashapp. - Web tab → Add new web app → Manual → set Virtualenv + Source code.
- WSGI →
application = app.server. - Reload web app → visit
https://<username>.pythonanywhere.com.
Troubleshooting
Logs – on the Web tab, open Error log and Server log to see import errors, tracebacks, and print outputs.
Python versions mismatch – the Python version chosen for the web app must match the one used to create your virtualenv.
Outbound internet on free tier – free accounts can only call specific allowed external sites. If your Dash app fetches data from arbitrary APIs, you’ll likely hit errors and will need to upgrade your plan. Here’s the list of PythonAnywhere’s allowed sites.
Updating PythonAnywhere Web App
By default, PythonAnywhere does not automatically pull updates from GitHub. There are a few ways to do it manually, and it’s also possible to automate with a webhook / GitHub-Actions workflow, though I’ll leave the webhook approach for another post. It’s more complex and requires some fiddling and extra configurations.
Manual Pull
After updating your GitHub repo, open a bash console in PythonAnywhere and run:
1
2
3
cd ~/sites/mydashapp
git pull origin main  # change 'main' to your branch name if needed
touch /var/www/synvan_pythonanywhere_com_wsgi.py  # change the wsgi filename to fit yours
The touch command is equivalent to reloading the web app from the Web tab manually.
This approach is simple and straightforward, works every time, though it’s manual. Here’s a one-line command to achieve it slightly faster:
1
cd ~/sites/mydashapp && git pull origin main && touch /var/www/synvan_pythonanywhere_com_wsgi.py
Manual Pull via Shell Script
Instead of typing this long command each time, we can store it in a shell file and simply run it whenever we need to update our app (less typing and easier to remember just the filename).
- Create a small shell script so you don’t have to type it every time:
1
 nano ~/update_app.sh
- Paste into your new file:
1
2
3
4
5
 #!/bin/bash
 cd ~/sites/mydashapp
 git pull origin main
 touch /var/www/synvan_pythonanywhere_com_wsgi.py
 echo "App updated and reloaded!"
- Save the file:
Ctrl+O→Enter→Ctrl+X. - Make it executable:
1
 chmod +x ~/update_app.sh
Now, whenever you push to GitHub, just go into PythonAnywhere console (or access it via SSH) and run:
1
~/update_app.sh
Pull & Reload on Schedule
PythonAnywhere has a scheduled tasks feature:
- Go to Tasks → Scheduled tasks.
- Set the time of the day the task should run.
- Set the command to run our created shell script
~/update_app.sh. - Give it a description (optional) and create the task.
Wrap-up
That’s it – web app is online. You can have a look at my side project live on PythonAnywhere here. PythonAnywhere isn’t the most powerful or feature-rich option out there, but for lightweight apps it’s reliable, simple, and beginner-friendly. If you’ve got a side project sitting locally on your machine, I’d recommend giving the free tier a try.